Tuesday, 27 February 2018

VFX INSPIRATION MOOD BOARD


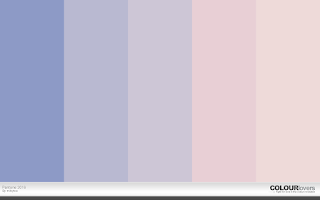
For VFX I have been thinking for a long time what I wanted my title sequence to be. At first I wanted something colourful and fun such as My Little Pony or Hello Kitty, but that would require a lot of advanced skills to make the 2D characters 3D and a lot of effects that I am not quite competent enough to use yet. So I decided to have a look at some interesting tutorials on After Effects and text in After Effects and came across a neon sign tutorial. After completing the tutorial I felt that this was quite achievable for me to do and that I should find a way to incorporate it somehow into my work. So I had a look at TV shows or films that had used neon lights and remembered the Black Mirror episode San Junipero and remembered the neon lights in that episode. In the bar that thee girls both meet the neon sign in the background is pink and blue and very striking as the light falls on their faces. The later in the episode when they kiss on the beach they are wearing pink and blue as a running colour scheme. So I think I am going to use this throughout my live action filming and my animation work on After Effects. Pictured below are some abstractions from the episode and some mood boards and colour schemes/swatches.


pink and blue colour scheme

neon sign at the bar 
colour palette swatch

another colour scheme 

the two running colours in neon
blue swatch

pink swatch

I hope you enjoy. Thank you.


Monday, 5 February 2018

AVID SESSION III


With this being our last booked in time to edit our films, the pressure was on. The Avid rooms are open until 8pm so if I didn't finish today I knew I still had time to adjust things and make improvements or changes. With my edit all in order, I decided to get to work on sorting out the audio. Some of the clips had talking in the background so I had to figure out how to make my own atmosphere track to cover the sound. I scrolled through lots of the footage to find a clip that had no noise, only the background atmosphere and I selected and cut that, the put it underneath the clip I wanted to change the audio of. Then I cut the new atmosphere track down to the size of the clip so it didn't interfere with any of the surrounding clips. I then had to deselect the video tracks, right click and select unlock tracks, by doing this it separates the audio from the footage. I then clicked on the audio and selected mute track. So when you play the clip through, it muted the original audio and instead plays the atmosphere track I put together. As some of the clips I was using had a lot of talking in the background I spent the morning sorting out the audio for them to make sure it was perfect. Then I decided that when the beginning of the film starts I should fade the music from silent to the atmos track so it doesn't sound all static and unprofessional. So I placed some markers on the audio timeline and lassoed them so they would both move at the same time. I made the first markers at zero, and then slowly build them up so you wouldn't notice the audio.

After all this was finished and tidied up I moved on to colour correction. This is my favourite bit as I adore taking something plain looking and natural and turning it super cinematic and colourful. So I started with going into the colour correction format under Work space in the top left hand corner. Using this work space is great because it allows you to see the clip your editing, the one before and the one after, so you can match your colouring and it flow nicely with your colour pallet. So I set off with the scene that had tungsten lighting putting a little bit of blue and purple in there, but reducing any green that I could see. This is what I did for the majority of the colouring for the tungsten lighting. However, when it came to the red lighting I had a different approach of course. I enhanced my red every so slightly but made the red chart have an S curve in the shape so the red peaked higher in the bottom left hand side of the screen and was more subtle in the middle of the screen. I also turned the master track up as that affects the exposure, and as some pieces were quite dark I just adjusted them ever so slightly. The was one cut away that was really orange for some reason, it was a close up of TJ's hand holding the chess piece, and as this was meant to be the natural tungsten lighting I enjoyed playing around to match it back to the lighting. I adjusted the reds a little lower and raised the blues and a bit of purple, then turned down the master track as it was a little over exposed. I had a lot of fun doing this but I am not quite finished with the edit, but I have enough time to spend a few more hours perfecting it and preparing it for being finished.


Colour Correction for Tungsten Light

Audio Control with Key Frames

Creating my own Atmos Track

Unlocking the Tracks

Creating the Atmos Overlay

I hope you enjoy. Thank you.

Thursday, 1 February 2018

LARGE FORMAT CAMERA INDUCTION


On Wednesday Peter Renn held an all day workshop on large format cameras, under the Fields and Frames unit. Beforehand I was really excited as I had never used large format before and I wanted to know how it looked and worked. Peter gave a presentation in the morning of famous photographers that use large format and why. We were shown some beautiful examples of large format work and it was incredible. The quality and definition you can get in the photo is incredible, and this allows you to be able to enlarge the images easier.

After the presentation, Peter got out some large format cameras and showed us how to set them up and make sure they aren't damaged and in good working order. He also told us what to book out if we ever need one, as when you book out a large format camera and a tripod, it doesn't come with the film paper slots, so you have to book them out separate. The setting up of the camera itself was fascinating, the care and time you take over the camera is important as it is delicate. We were also shown how to load the film, and how to set the camera up to take a picture. This was a lot of information to take it, but luckily I wrote notes. We were then reminded on the light meters and how they will come in handy whilst shooting. After this, Peter gave us some film paper and sent us off to take pictures of whatever we wanted and experiment. We got into groups and my group was me, Nina and George. we decided to go around uni and try and take a self portrait in the reflection of a window. but we accidently exposed the paper so it went completely white instead of capturing the photo. Sadly George had to leave so it was up to me and Nina to see if we could figure out how to take a photo and it work. After multiple attempts of it being over and under exposed we finally got there, and started to shoot some really pretty photos. I think it was easily one of the best and most fun workshops I have been to, I enjoyed the laid back manor and Peter allowed us to play and experiment and capture whatever we wanted. Pictured below are some of the camera and process.

Photo Paper

Failed Self Portrait

The Camera

The Viewfinder 

Darkroom

Behind The Scenes

Behind The Scenes II

I hope you enjoy. Thank you.

Monday, 29 January 2018

AVID SESSION II


For our second session of Avid I was grateful I had stopped editing at a good point in the process as it meant I could pick up where I left off. I decided today that I would start working on the credits etc. I did this because I knew it would be something quite time consuming and I thought this was a good chance to complete it with lots of time to spare so I am happy with it. I started out writing down on a piece of paper the order the credits had to come in and what people's roles were in studio shoot. Then I set about making the credits. I am someone who is very selective about fonts, so I did spend quite a while selecting the font I wanted. I knew that I wanted a very clean and minimalist font as whilst the credits come up, I have some B roll footage playing in the background.

Once I had selected my font, typed everyone's names and roles out and selected how long I wanted them to appear on the screen for I felt content with the credits. With this all nicely finished, I went back to editing the bulk of the film. I continued where I left off from the first session and kept building on top of that edit. I felt like I was making good progress. Although lots of the rushes were too shaky or unusable I felt I did well in making an edit with what I had and it still making sense. I had to adjust some clips to be longer or shorter as I was cutting in between them but paying close attention to your edit means that you get smoother transitions and it looks sleek and well put together. This took up the rest of the day as I wanted to get the sequence looking perfect and that I was happy with the order of the clips and things. I felt that this was a good place to stop in the edit. All the sequence complete, now just ready for colour correction and adjusting some audio.
Title Sequence

Title Layering 

I hope you enjoy. Thank you.

Monday, 22 January 2018

AVID SESSION I


After studio shoot had wrapped up, it was time to edit. We had some complications on set with the Ninja blade not capturing our footage in the Avid codec. So very very kindly Victoria trans-coded it for us, so it would be all ready for editing on Monday. On Monday morning, we all went into the avid room, logged onto the Nexis with our group log in. Then all of our rushes were mounted and we just need to go into Avid to start. Victoria helped us with setting up ready to edit. As these were shared rushes between the two groups we had to first select all of the rushes then duplicate them, so if we trimmed and effected a clip it wouldn't actually damage the original clip. Once this was all done which didn't take long, I decided to go through the rushes and colour label them if they were worth using or not. As I was going through the rushes colour labelling them, I also renamed them so I could quickly and easily what scene and take it was, or if it was B roll. This took a good few hours as there was so much footage to get through. After I had completed that task, I decided to look at the shooting script and storyboards to familiarise myself with the order again. Although you were allowed to make an edit however you wanted, I wanted to try and do one in order of the story. I started to select my clips for the beginning that I wanted, trimming them down and making sure the audio was okay. I then went about cutting the same scene with different lighting together to make it a little more interesting, I had only done about 45 seconds before the end of the day approached, I felt this was a good place to stop as the more I stare at my work the more I criticise it.


Edit Coming Along

Colour Coded Takes, Scenes and Bad Footage

I hope you enjoy. Thank you.

Saturday, 13 January 2018

DANCE FILM RESEARCH AND INSPIRATION


With the beginning of a new term, there comes lots of exciting new projects for us to create. This term we are learning about dance film and then through research, produce one. Rosie set us a task after showing us some of the oldest forms of dance film, to go and find some of our own that were inspiring to us. So I did some research into dance films, as I have some dance background I had a small understanding on what a dance film is like and how the camera was part of the choreography too.

One film that came into my head was a dance called SHIFT choreographed by Ela Orlarte. This is a favourite of mine, as last year when it was released my old dance teacher sent me a link to it thinking that the movement was right up my street. I instantly fell in love with it. It is a piece with three women, who through movement document the struggles of friendship and how to support each other. One of the dancers is called Kameron Jonson, who is a beautiful dancer, who is seemingly separate from the other two (Tiffany Krause and Ellen Vierse) , moves in a way to try to connect with the other dancers. As the piece continues the other two dancers interact more with Jonson and show their bond with her. You see them handle her, and in a sense guide her as she slowly becomes a part of them too. As the piece comes to an end you see the two dancers freeze in position, signifying the end of the dance, yet Johnson carries on creating subtle movements with her body, perhaps displaying that she is still slightly separate from the two. This is one of my favourite pieces as I adore the movement and grace the dancers hold.


My next piece that I was inspired by, was a music video that George showed me in class, as I am interested in one take films. The music video is called Demons by Joji and shows a person dressed in a monster costume dancing in an empty swimming pool. Not once does the camera cut and I am interested in that style and how you can capture a whole dance without a cut. At the beginning he is chained to a pole in the middle of the pool by his ankle, and shows very little movement. Sometimes slightly raising his arm or leg, or getting out of his chair. But as the film progresses you see the dancer's movement open up more and and he starts to move more, with a heavy body, around the space. He moves in a very heavy manor and all his movements are very functional to being a person. However I really enjoy the camera work throughout the whole piece.


I hope you enjoy. Thank you.


Friday, 12 January 2018

MAPS AND NETWORKS INSTALLATION


After completing the videos for maps and networks, we then had to set up our installation after Christmas. On the first day of coming back to uni, as a class we walked up and down the corridor with Rosie deciding where everyone's work would go. Danielle and I were unable to get The Box in the quad as it was currently occupied with other work. So we got to work thinking where we would want our twin screen. We decided the alcove near the beginning of the corridor would be excellent for us.

The next day we came into uni and learned how to drill the brackets into the walls, The technician Tom was very kind and helped us all day with the brackets, making sure they were secure and straight. I measured out the wall and the screens, and worked out exactly where I wanted them to go so they would be central. Once the brackets were up, we could mount our two TV screens. This was a bit fiddly but we did it in the end. We were fortunate in our work being near a power supply, so we just plugged them into the mains. To make sure the cables weren't tidy, we had to attach this stuff called trunking that was essentially a plastic tube you could feed wires through and it would look tidy and nice. So we set about finding some trunking and got that all attached

On Wednesday Danielle went to go and source materials to dress the alcove we had chosen. We had talked previously about what we wanted it to look like, we decided dressing it like a bedroom felt appropriate and that would make it link in with the film, and of course have lots of red.

Thursday came around quickly and Danielle had sourced some pretty red netting to hang around our display to look like a bedroom. We decided to bring in spare bed sheets, cushions, and things you would typically find in a girls bedroom, like underwear, fake nails, makeup etc. We stapled the red netting around the ends of the alcove with a staple gun, then set to work on securing all the sheets and things spread across the bed. We printed off pictures about feminism and girl bands to make the room feel it had someone living there. This took nearly all day as we wanted it perfect.

As the week drew to a close, on Friday we were all finished with our installation so we just took lots of photos of it because we are so proud. I am super happy the way it turned out and looked. We had mixed feedback on our work from students passing by and watching it, but if art doesn't create conversation and differing opinions than is it good art? I am happy at how it looks and how well we managed to set the scene alongside our screens.


I hope you enjoy. Thank you